← All recipes
Standing rib roast Chef Steps
Steps
- Dear ChefSteps,I am and my email is . I want to join 344,019 others to learn to be a better cook!
- Sign Up
- Standing Rib RoastEstimated time to cook: 1 hr active; 5–6 hrs total
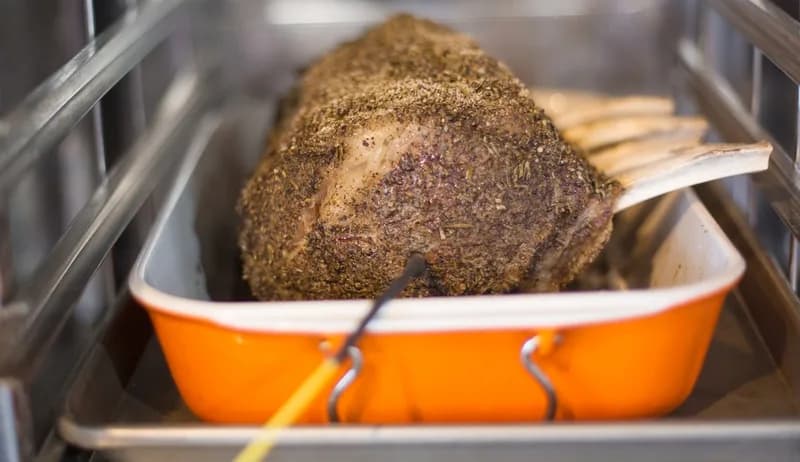
- If you throw a last-minute dinner but then serve your guests a gorgeous rib roast, they’re going to think you’re some kind of wizard. Deep brown crust, juicy pink meat—prime rib is elegant, crowd-friendly, and really quite easy to prepare, requiring no special equipment or hard-to-find ingredients. And while we too often corral this carnivore crack into the holiday-meal category, there’s no reason you can’t use rib roast as the inspiration to throw an impromptu party. In fact, we highly encourage it. Pop by the market and pick one up, tell your friends to come by in a few hours with some wine or a side dish, and enjoy a casually spectacular repast with none of that weird stiffness of special-occasion meals. Got leftovers? Lucky you. Roast beef anchors one of the world’s most delicious sandwiches: the French dip.
- Here, we walk you through the three simple stages of creating a perfect rib roast. Once you’ve tried the well-tested method, we bet you’ll return to it often, reproducing the roast easily without needing to consult a recipe. French the bones yourself or ask your butcher to do it. Swap in whatever fresh herbs you happen to have on hand. Fiddle with doneness until the perfect amount of pinkness is yours. This is destined to become your house specialty, so go ahead and make it your own. A holiday-worthy dish that’s flexible and easy to make on the fly? Now that’s what we call culinary magic.
- Save
- PrintIngredients
- Edit Scale & Units1 eachStanding Rib Roast, about 4 rib bones1.1 ozFresh herbs, such as rosemary and thyme0.53 ozBlack peppercorns, whole1.4 ozMaldon salt, or other coarse salt1 eachEgg whiteEquipmentButcher's twineDigital thermometerThermocouple probe (optional)Timing1 hr active; 5–6 hrs totalYield8 servings
- Additional TipLet’s talk beef.
- It’s not hard to order a rib roast, but when you’re eye to eye with the meatmonger, knowing the right terms will help you confidently request the exact thing you’re after. Here are some quick answers to common questions.What is a rib roast anyway?A rib roast refers to cuts from the seven full ribs that line a steer’s back between the shoulder and the loin. These ribs are connected to a large eye of meat and a hunk of fat-marbled muscle commonly referred to as the cap or the deckle. Home cooks typically buy a two- or four-rib roast, as the whole shebang-of-seven is likely way too big for their ovens and can yield up to 30 pounds of beef. Even for hardcore carnivores, that’s hella meat, yo.
- How many ribs do I need per person?One rib yields about two servings. If your friends are thinking about swimsuit season, you may end up with leftovers. If you’re cooking a late-night, post-shift feast for a bunch of chefs, however, you may well need more. (Also, you should probably lock up the liquor cabinet.)
- So what exactly is a “standing rib roast”? You may have heard the term standing rib roast knocked about and wondered, “Hey, what could that mean?” This: Rib roasts can be cooked boneless—in which case the meat has been removed from the rack of rib bones to which it was attached—or along with that rack of rib bones. In the latter case, the meat is usually arranged on top of that rack of bones before it goes in the oven. As your roast cooks, the bone rack acts as a natural version of the metal rack that comes inside roasting pans. So the roast is standing on top of the bones. (If this doesn’t make sense, don’t worry; it will once you’ve worked through this technique.)
- And “prime rib”?Prime rib—a phrase that predates the USDA grading system—is used interchangeably with rib roast, but the USDA does not require that a rib roast come from USDA Prime–grade beef. Don’t worry about that—the next level down is Choice, and Choice cuts should prove adequately juicy and delicious.
- What else do I need to know?Well, if you’re interested in customizing your cut further, you can request ribs from the “blade end”—also called the “chuck end”—or the “loin end”—also known as the “first cut.” The blade end, comprised of the ribs located closer to the cow’s shoulder, is typically fattier, the stuff that Jack Sprat’s wife (and the ChefSteps staff) really gets into. The loin end—located closer to the loin—is leaner and more tender.
- Cool, anything else?Just this: Before you shop, you need to decide whether you’re asking the butcher to prepare your roast for cooking or planning to do it yourself. Some butchers at specialty grocery stores like Whole Foods will french the rib bones, removing all fat, meat, and connective tissue from the bones to expose a pretty, polished row. A professional can also remove the bones and then tie them back on, a step that helps keep the meat moist and also makes it easy to carve after cooking.
- Show More1Prepare roast
- Preheat oven
- We cook this roast at 200 °F / 93 °C for about four hours. Depending on your oven and how much time you have, you can go lower, to 175 °F / 79 °C, or higher, to 225 °F / 107 °C.We roast at low temperatures to yield evenly cooked, juicy meat and to ensure we get the doneness we prefer. When you cook at a low temperature, the meat’s internal temperature rises much more slowly, meaning you have a larger window of time during which the meat is done to your preference. The higher the oven’s temperature, the more quickly the meat goes from rare to well done and thus the narrower your window to get it right.
- Pick and chop herbs
- 1.1 ozFresh herbs, such as thyme and rosemaryPick rosemary and thyme. Chop finely. Set aside.CHEF’S TIP: You can use any fresh herbs you like, but the heartier ones will always work best. We used rosemary and thyme, but sage or marjoram would work too.
- Grind or crack peppercorns
- 0.53 ozBlack peppercornsGrind 0.53 oz of peppercorns. The finer you grind, the spicier your roast will taste, because more pepper will stick to the meat.PSST: No grinder? You can crack the pepper with a cutting board and a pan. Place the peppercorns on the board and apply pressure with the bottom of the pan until they’re about the same size as in the right-hand photo.
- Combine herbs, pepper, and salt for rub
- 1.4 ozMaldon salt, or other coarse saltCombine dry ingredients in a bowl and set aside.Whisk egg white
- 1 eachEgg whiteWith a whisk, beat egg whites to create a velvety foam. It’s important to create a uniform texture because it will make the eggs much easier to work with later on.Set whisked egg whites aside.
- NOTE: If you’re frenching your roast and the whisked egg needs to rest for a spell, that’s okay. It won’t become unwhisked, so don’t worry.
- Additional TipTo french or not to french?
- Frenching—removing fat, meat, and connective tissue from the rib-rack bones—is optional, but we really like prepping roasts this way. Beyond just making your dish look epic, frenching the rib bones—and then separating the roast from the rack and tying the two pieces back together—will help you achieve a way cleaner carving job.Of course, you can always ask your butcher to french your roast for you. So why do it at home? First, because it’s fun. You learn an awesome new skill you can replicate using pork, rabbit, a rack of lamb—whatever. And second, you can often achieve better results doing it yourself, especially once you’ve mastered the technique. Finally, friend, everyone will be crazy impressed when you casually mention that the frenching job was yours and yours alone. Does it require patience? Yes. The first time you do it, does it take awhile? It does, but you can still have great success right out of the gate. Just be sure to keep your meat cool as you work. Now get to it!
- Show MoreFrench bones (optional)
- 1 eachStanding Rib RoastHere we demonstrate our favorite method for removing the fat, meat, and connective tissue that surround the rib bones of a roast.Step 1: Score sidesLay roast on the work surface with the rib rack facing down. On one side of the roast, locate the main muscle, which should have a c-shaped curve of fat hugging it. We want to keep this delicious fat intact, so position your knife just to the side of it and perpendicular to the roast.
- Cut into the side of the meat from top to bottom with a quick, steady motion. (Use a kitchen towel to steady the roast with your other hand.) You want to create a slit that’s about a quarter-inch deep. Repeat this process on the other side.
- Position your knife on top of the rack, then use it to draw a line down the length of the roast that connects the slits you created on the sides.
- Step 2: Begin to separate meat from bonesWork your knife between the rib bones, using a back-and-forth motion along the line that you created along the top of the rib bones in Step 1. Rotate the roast and repeat.Flip the roast so that the fat cap is facing up. Just like you did on the other side, draw a line across the roast to connect the indents on each side. Cut along the line again, only this time allow your knife to go as deep as the rib bones. Work the knife between the bones using the same back-and-forth motion you used on the other side.
- Step 3: Remove membraneFlip the roast again so that the fat cap is facing down. With your knife, remove the top layer of membrane on top of the rib bones. This will help you see things better as you work.Step 4: Peel membrane away from the bones With your knife, carefully peel away the connective tissue surrounding the bones. Push down on the meat surrounding the bones by applying pressure with your knife. Continue peeling and pushing away, wiping off your blade as needed, until there’s a gap between each rib bone and the tissue surrounding it.This is the hardest part, so be patient and stick with it. You’re almost done.
- Step 5: Remove fat, meat, and membrane around rib bones Cut off the section of fat and meat underneath the rib rack, leaving enough material close to the bones that you can get a grip on it.Using two kitchen towels for grip, pull the remaining meat off the bones. Your ability to do this easily will depend on how well you separated the membrane from the bones in the last step. If you find that the meat is not coming off, go back to Step 4 and try peeling the membrane back more thoroughly. Again, patience is key.
- Step 6: Clean bones Use a kitchen towel to remove any material that’s clinging to the bones. Get it all off—if you leave anything there it will burn and blacken in the oven, sullying your perfect frenching job.Separate the rack from the roast
- Working as closely to the rib bones as possible, cut between the roast and the rack. This takes a little finessing, as you’ll be working around some hard bone. But keep going, you got this.Trim
- With a knife, cut away connective tissue and cartilage from the roast. Cartilage is translucent and feels hard and plasticky. It’s important to remove these unwanted bits—they won’t soften during roasting the way they would if you were braising the meat.Tie roast
- Cut five pieces of butcher’s twine long enough to tie around the roast and rack.Lay roast flat on your work surface. Place rib rack atop roast, where it was before you trimmed it. Position twine at equal distances between each bone.
- Tie the string between each bone. We loop one end of the string three times around the other, then pull taut and tie a second knot to get a tight tie.
- Brush with egg white
- Coat entire roast with egg white, avoiding the bone section. We do this to help the salt rub stick to the surface of the meat, as well as to develop a nice crust in the oven.Coat roast with rub
- Evenly sprinkle rub around the roast, coating as much of the meat’s surface as possible.2Cook; rest
- We cook our rib roast at 200 °F / 93 °C for about four hours, to an internal temperature between 129 °F / 54 °C and 136 °F / 58 °C. This yields pink, juicy, flavorful meat. If you prefer a “medium” roast—rosy and firm—cook to 140 °F / 60 °C instead. Temperatures above that will take you from medium to medium-well and beyond.For the most accurate temperature read, insert a thermocouple probe into the center of the roast. If you don’t have a probe, monitor the temperature with a digital thermometer as you cook.
- Remove the roast from the oven and let rest 20 to 30 minutes.
- 3Carve and serve
- Separate bones from roast to carve. (Don’t discard that rib meat though! It’s delicious!) Remove the butcher’s twine.Remove any unwanted fat, then cut meat into thin slices. For presentation, place atop the rib rack to display your awesome frenching skills.
- Serve, and revel in your newfound meat-wizard status.
Originally published at Chefsteps.com. Reproduced for personal collection.